# My C/C++ Dev Setup with VSCode
Lately, I have been working on Algolia's search engine which is a complex C++ code-base. I felt the need of a perfect editor's set up to work efficiently.
Just before working on the engine, I was working on Algolia's C# Library with VSCode and people working with me know how much I love this editor.
This article is here to share with you how I customized my VSCode to have an efficient C/C++ setup! 😃 If you already know a part of the setup, feel free to jump to the desired section with the help of the right panel.
# The Language Server
In my opinion, this is the most important piece to have a perfect editor's setup is the language server. What is used for? It adds features to your text editor like autocomplete, go to definition or documentation on hover for your favorite programming language. More information can be found on the Language Server Protocol (LSP) official's website.
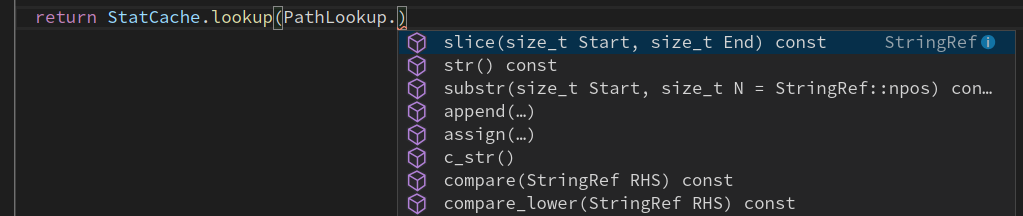 Image taken from the clangd's page.
# Which language Server to use for your C/C++ projects?
The good news is that we have the choice, that's great!
We have clangd, ccls.. However, this article will focus on clangd, because it's the one I know the most and I use it on a daily basis.
# clangd
clangd is based on the Clang C/C++ compiler and is part of the LLVM project, thus it's well maintained and reliable. Now that we know everything about clangd, let's add it to our VSCode!
Install clangd if you don't have it already
You can skip this part if clangd/llvm is already installed.
On MacOS:
brew install llvm. clangd is packed with llvm.
On Linux:
sudo apt-get install clang-tools-9- The clangd executable will be installed as
/usr/bin/clangd-9. You can make it the default clangd: sudo update-alternatives --install /usr/bin/clangd clangd /usr/bin/clangd-9 100
Install vscode-clangd extension
This extension provides C/C++ language IDE features for VS Code using clangd: You can download it here.
⚠️ Important Note: if you have Microsoft C/C++ extensions installed you should disable it for the projects you'd like to use clangd, otherwise both plugins will conflict and make your computer to skyrocket.
Project setup
As all C/C++ are unique we need to tell clangd how our project is built. This is when the compile_commands.json file kicks in! This file can be generated by your favorite build system generator, for example with CMake we just need to add -DCMAKE_EXPORT_COMPILE_COMMANDS=1 to our build command. For example:
cmake -H. -B build/debug -DCMAKE_EXPORT_COMPILE_COMMANDS=1
All good we now have, the compile_commands.json file generated, we now need to tell clangd where it's located. By default, the extension will search for the file as the root of our project, but as here we have separated build folders, we need to specify it to clangd.
Modify in VSCode's settings:
"clangd.arguments": [
    "--compile-commands-dir=build/debug"
    ]
Note: this for clangd9 and above. For clangd8 and other it was -compile-commands-dir=build/debug. Please note the simple dash!
Troubleshooting common issues
For some reasons clangd could fail to resolve stdlib headers files.
One solution is to explicitly give the stdlib headers path to clangd.
# For example:
--resource-dir=/usr/local/opt/llvm
We are now all set for the language server! Let's move to the debug tooling.
# Debug Tooling
# CodeLLDB
If like me, you enjoy debugging step by step in your editor, this article will help you! For this, we need to install another extension CodeLLDB, which is according to me, the more reliable one currently available.
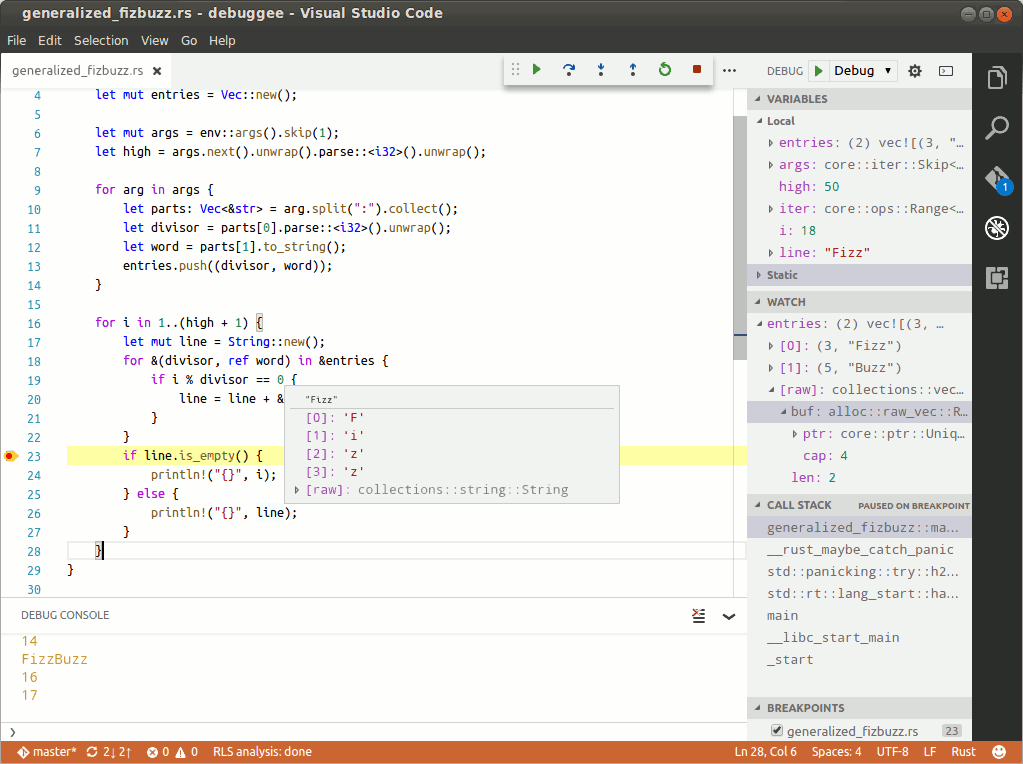 Image taken from the CodeLLDB's page.
Once we downloaded the extension, we need to tell it where LLDB is located. Let's add in our VSCode's settings, for example, on my OSX setup:
"lldb.executable": "/usr/local/opt/llvm/bin/lldb"
We are all set, the extension is now linked to our dear LLDB. Now wouldn't that be cool to press F5 and start debugging our project? This is where the VSCode tasks join the party! Let's discover how to tune them for our project.
# VSCode tasks
VSCode offers us the possibility to customize our build and debugging experiences with the help of two separate files: tasks.json and launch.json.
What are they used for? Let's discover it.
# Build Tasks with tasks.json
We can create our own custom's build task by modifying or creating a tasks.json, file in the .vscode folder which should be located at the root level of our project.
Let's for example create a simple build task, to build our project in Release mode with Ninja.
{
    "version": "2.0.0",
    "tasks": [
        {
            "type": "shell",
            "label": "cmake build/release",
            "command": "cmake -H. -B build/release -GNinja -DCMAKE_EXPORT_COMPILE_COMMANDS=1 -DCMAKE_BUILD_TYPE=Release",
            "group": "build"
        }
    ]
}
What are all those parameters about?
- type: Tells VSCode that it's a shell task that should be run
- label: The label of Build's task
- command: The actual command to build the project
- problemMatcher:
- group: It tells VSCode what kind of task we are running, here a build one
Now simply press ⇧⌘B to show the following picker:

Isn't that cool?
Now you can create other Build tasks for your project like, Build Debug, Build Sanitize, etc. Full documentation about task.json can be found on VSCode's doc.
Now that our project is built it could be cool to debug it what do you think? Let's create a launch.json file for that!
# Debug with launch.json
VS Code's built-in debugger helps me accelerate my debugging loop, I highly recommend you to use it, but for that, we first need to specify how to debug our C/C++ project. The built-in debugger relies on the launch.json file which is located in the .vscode folder of your project.
The file is quite simple to customize, let's create a task to attach to let's say a helloword binary we built before.
{
    "name": "(lldb) Launch HelloWorld",
    "type": "lldb",
    "request": "launch",
    "preLaunchTask": "cmake build/debug",
    "program": "${workspaceRoot}/build/debug/helloword"
}
Now, go to the debug panel and select this configuration, set a breakpoint in the code-base, and finally hit F5. Congratulations! You are debugging your C/C++ project with VSCode.
Tip 💡: I like to have my binary up to date when debugging, that's why in preLaunchTask we are calling the build task we defined before.
Now, let's create another task to attach to an existing process:
{
    "name": "(lldb) Attach HelloWord",
    "type": "lldb",
    "request": "attach",
    "program": "${workspaceRoot}/build/debug/helloworld",
    "pid": "${command:pickProcess}"
},
Now, go to the debug panel and select this configuration, set a breakpoint in the code-base and finally hit F5, VSCode will prompt us with a picker to select a Process ID (pid), choose the one from the process you'd like to debug and you are all set. VSCode is prompting us to select a process thanks to the "pid": "${command:pickProcess}" field of the configuration.
Tip 💡: Note that the main difference between the two described tasks is the request field which is used to either attach or launch a process.
# Going further
Customization can go way further, for that, I invite you to check the full documentation about launch.json on VSCode's doc and to check-out, the CodeLLDB's documentation as well to discover additional parameters.
We are all set! We can now launch, attach to processes, and debug them for our editor. Isn't that great? Let's finish by integrating clang-format to our editor.
# Integrated clang-format
Last but not least, having clang-format working with VSCode is a must-have to save time and always have a clean formatted code.
To achieve this, I am using the clang-format extension which allows clang-format (version 3.8 or higher) to be used to format C/C++ source files directly from within Visual Studio Code.
I love the VSCode's feature to format on save, that's why I enabled it by default in my settings.json:
{
    "editor.formatOnSave": true
}
In case the extension can't find the clang-format binary, you can specify it with the following option:
{
    "clang-format.executable": "/absolute/path/to/clang-format"
}
We are good! Now let's finish by customizing our editor with a cool C/C++ theme.
# C++ Friendly Themes
Unfortunately, not all VSCode's themes fully support semantic coloration for C/C++'s complex syntax. Here is a non-exhaustive lists of C/C++ friendly themes I am using:
Tip 💡: I am also a big fan of the centered layout of VSCode. Give it a try!
# Closing Words
You are now all set to write some C/C++ in good conditions with VSCode.
If you enjoyed this article feel free to share it and tell me on Twitter!
See you soon for another article 😃